If you want to get a little more backstory and lore in Hellblade 2: Senua’s Saga, you’ll need to seek out the game’s collectibles.
While Hellblade: Senua’s Sacrifice had 44 Lorestones to collect, Hellblade 2 has a combination of two collectibles: Lorestangirs (the game’s version of Lorestones); and stone faces that hide ancient trees and stories behind them. There are 18 Lorestangirs and 17 rock faces to remove (to get access to the trees behind them).
The breakdown of each collectible per chapter is as follows:
Chapter 1 - Reykjanesta - 1 x Lorestangir
Chapter 2 - Freyslaug - 4 x Lorestangir & 2 x Faces
Chapter 3 - Raudholar - 6 x Lorestangir & 5 x Faces
Chapter 4 - Huldufolk - 3 x Lorestangir & 4 x Faces
Chapter 5 - Bardarvik - 4 x Lorestangir & 6 x Faces
Chapter 6 - Borgarvirki - No collectibles
Below you will find the location of all 35 collectibles (as well as which sub-chapter they’re in, if you’re looking to use Chapter Select after you’ve finished the game). Good luck out there!
Lorestangir #1 - After heading through the tutorial area, after creeping along the cliff-face, while going towards the woman’s screams, this Lorestangir is on the right, on the cliff, overlooking the ocean (Chapter 1 - Reykjanesta - Landfall).
Chapter 2 Collectibles Locations
Lorestangir #2 - In the next chapter, when walking with the slavemaster, there’s some thatched-roofed huts on the right. The Lorestangir is behind them (Chapter 2 - Freyslaug - Freyslaug Sighted).
Lorestangir #3 - After passing through the Rune gate in the Draugr village and crossing the small bridge (after the flashback sequence), when you come out of the first house, head left and follow the path around until you have to crouch under a wooden barricade. The Lorestangir is on the other side of it, on the right (Chapter 2 - Freyslaug - Return Home).
Face #1 - After the flashback scene, you’ll enter the next part of the village. Before heading over the large bridge towards the light, your first stone face is to the left, by the house. (Chapter 2 - Return Home).
Lorestangir #4 - When you drop down into the Draaugr infested part of the village, the path onwards will be straightforward, but near to the totem on the right, take a left and head up the ladder. Follow it to the end for the Lorestangir (Chapter 2 - Freyslaug - Draugar Ceremony).
Face #2 - To the left of the broken bridge, after saving Fargrimr and dawn breaking. Follow it to the end and Focus to reveal the tree (Chapter 2 - Freyslaug - Meeting the Stranger).
Lorestangir #5 - After rescuing Fargrimr from the Draugar ritual, on your way back to his village you’ll head down a slope to the right of a broken bridge. At a marker on the path down the hill, take a left and follow that path to the end. The Lorestangir is at the end of this trail (Chapter 2 - Freyslaug - Meeting the Stranger).
Chapter 3 Collectibles Locations
Lorestangir #6 - After the transition to a new area, when you start to get into the settlement’s outskirts, there’ll be a pole in the middle of the path, from there head to the left, and go around the back of the ruins of a house. There’s a Lorestangir in a small indentation further beyond the house (Chapter 3 - Raudholar - Red Hills).
Face #3 - The first path you walk down (same one we mentioned above), when it opens up, head left, past the ruined house, into the far corner. There you’ll find this stone face (Chapter 3 - Raudholar - On the Hill).
Face #4 - The first path you walk down, when it opens up, head right and right again and follow it to the dead end. At the end, on the left, is this stone face (Chapter 3 - Raudholar - On the Hill).
Lorestangir #7 - Once you’ve made it to Fargrimr’s settlement and before you head off to find the hidden folk, do a 180 and follow the path all the way behind Fargrimr’s hut to the left. At the top, in front of the hut on the hill, is this Lorestangir (Chapter 3 - Raudholar - On the Hill).
Face #5 - On your way out of Fargrimr’s settlement, before you drop down a white ledge, on that path on the left is a stone head. Focus on it and the tree is behind it on the left (Chapter 3 - Raudholar - On the Hill).
Face #6 - After solving the puzzle with the orbs to open up the blocked path, on the right is a head you can Focus on, with a tree behind it (Chapter 3 - Raudholar - On the Hill).
Lorestangir #8 - After solving the puzzle with the orbs to open up the blocked path, head up the hill and to the left in the far corner. Follow the path around to find this Lorestangir (Chapter 3 - Raudholar - On the Hill).
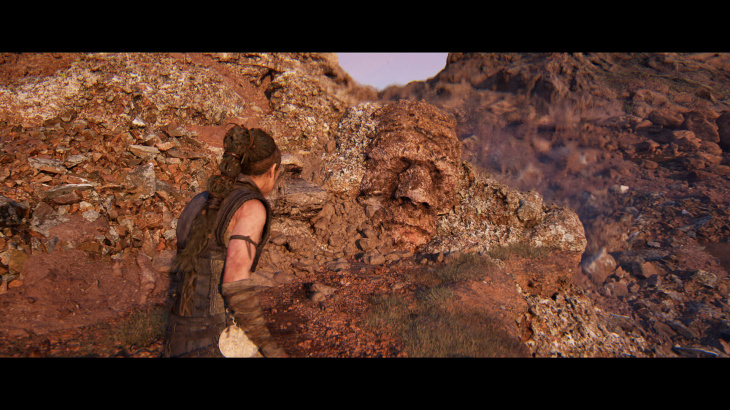
Face #7 - After solving the second orb puzzle, and then dropping down two ledges. Before the water, on the right, climb up to the top, where you’ll find a large rock skull (and the tree) (Chapter 3 - Raudholar - On the Hill).
Lorestangir #9 - After solving the second orb puzzle, and then dropping down two ledges. After the small bit of water, hang a left and head through the rocks. Follow the path to the end for this Lorestangir (Chapter 3 - Raudholar - On the Hill).
Lorestangir #10 - On the opposite side of the gap in the rocks to the previous Lorestangir (just a bit further up the path) there’s a gap underneath the rock. Crawl under it and there’s a Lorestangir at the end (Chapter 3 - Raudholar - On the Hill).
Lorestangir #11 - On the ceiling behind the third orb during the lake orb puzzle (the third orb puzzle). Just head to the wall behind the third and it’ll be on the ceiling ready to interact with. Only available during the orb puzzle (Chapter 3 - Raudholar - Find the Hiddenfolk).
Chapter 4 Collectibles Locations
Face #8 - When you get into the actual caves and have to drop down, head forward and to the left into the crawlspace. The face in the wall is on the left-hand side of the next chamber - (Chapter 4 - Huldufolk - Into the Caves).
Lorestangir #12 - When in the caves (underneath the lake), after dropping down a couple of ledges, when the cave starts to open out, head right (past a shield leaning up against a wall) for this Lorestangir (Chapter 4 - Huldufolk - Enter the Caves).
Face #9 - When you drop the dust onto the blue flame to clear the way through to the next area (first time you distinguish a flame and not light it), turn around and there’s a stone head in the wall with this tree behind it (Chapter 4 - Huldufolk - Into the Caves).
Face #10 - When you drop down into the water, do a 180 and head into the dead end. Use the Focus ability on the wall (which doesn’t really look like a stone head at first glance), but there is a tree behind it (Chapter 4 - Huldufolk - Into the Caves).
Lorestangir #13 - After solving the light bridge puzzle you’ll head into some caves. When it starts to open out, look to the right and then drop down for this Lorestangir (Chapter 4 - Huldufolk - Trial of Wisdom).
Face #11 - After giving away your sword and following the light through the dark, as soon as you come out into safety, there’s a face in the stone wall on your left (to the right is where you need to go for the main objective) (Chapter 4 - Huldufolk - Act of Sacrifice).
Lorestangir #14 - After giving away your sword and following the light through the dark, before the final puzzle chamber (which is left), on the right is a tunnel that leads to this Lorestangir (Chapter 4 - Huldufolk - Act of Sacrifice).
Chapter 5 Collectibles Locations
Face #12 - When you reach the next act - with Thorgestr and Fargrimr - you’ll walk through a peaceful mountain path. When you reach the small stream (not the main river with the cutscene), the stone face is underneath the waterfall (Chapter 5 - Bardarvik - To the Sea).
Lorestangir #15 - When you reach the next act - with Thorgestr and Fargrimr - you’ll walk through a peaceful mountain path. You’ll eventually come across a small waterfall and a stream. Cross over it, go up the hill, and at the top of the hill do a 180 and follow the path back towards the waterfall. This will lead you above it, where there is a Lorestangir at the top, overlooking the coast below (Chapter 5 - Bardarvik - To the Sea).
Face #13 - When you’re with Astridr you’ll have to squeeze through a gap. Before you do, there’s a stone head on the right side of the pathway (Chapter 5 - Bardarvik - Sjavarrisi).
Lorestangir #16 - After hearing the giant and heading back to the settlement, you’ll climb up, and then drop down a ledge (after squeezing through a crack in the wall). When you mantle over a stone pillar, head right to the top of the hill, and then head right through a gap in the rocks. Follow the path (under the crawlspace) to the top and the Lorestangir is there (Chapter 5 - Bardarvik - Sjavarrisi).
Face #14 - After the first Rune door (after the battle with the Draugar), head to the right down a path after you’ve passed through the door. The stone face and tree are that way (Chapter 5 - Bardarvik - Another Question).
Face #15 - When solving the Rune door puzzle on the beach, when you’re in the second area of the beach, go between the rocks where the blue haze is, and the stone face is down there on the right (Chapter 5 - Bardarvik - Another Question).
Lorestangir #17 - When solving the Rune door puzzle on the beach, when you’re in the second area of the beach, go between the rocks where the blue haze is, and then follow it to the end and to the right. The Lorestangir is there (Chapter 5 - Bardarvik - Another Question).
Face #16 - After coming out of the ocean into the village, a little way in (before you head up), there’s a path on the right that leads to a dead end. Down there, on the right, will be the penultimate stone head. Use Focus and the tree is at the end of that path (Chapter 5 - Bardarvik - Another Question).
Lorestangir #18 - After coming out of the ocean into the village, a little way in you’ll come to a crossroads of sorts - there’ll be a small house with a lantern at the far end of the village. Right is the correct way deeper into the village and to the objective. Left and round the back is where to find the last Lorestangir (Chapter 5 - Bardarvik - Another Question).
Face #17 - After coming out of the ocean into the village, a little way in you’ll come to a crossroads of sorts - there’ll be a small house with a lantern at the far end of the village. Up and to the right is the correct way deeper into the village and to the objective. Left and round the back is where to find the last stone face - behind the second house (to the left) (Chapter 5 - Bardarvik - Another Question).

Tuesday, May 21, 2024
If you want to get a little more backstory and lore in Hellblade 2: Senua’s Saga, you’ll need to seek out the game’s collectibles.
While Hellblade: Senua’s Sacrifice had 44 Lorestones to collect, Hellblade 2 has a combination of two collectibles: Lorestangirs (the game’s version of Lorestones); and stone faces that hide ancient trees and stories behind them. There are 18 Lorestangirs and 17 rock faces to remove (to get access to the trees behind them).
The breakdown of each collectible per chapter is as follows:
Below you will find the location of all 35 collectibles (as well as which sub-chapter they’re in, if you’re looking to use Chapter Select after you’ve finished the game). Good luck out there!
Chapter 1 Collectibles Locations
Chapter 2 Collectibles Locations
Chapter 3 Collectibles Locations
Chapter 4 Collectibles Locations
Chapter 5 Collectibles Locations
All Face Locations
All Lorestangir Locations